How to use System Preferences in macOS Sierra (and Mac OS X): Complete guide to personalising the settings for your Mac

We aim to cover the whole of macOS / OS X System Preferences in this article (currently being updated for macOS Sierra). You can find the following:
Page 1: What is System Preferences, General, Screensaver, Dock, Mission Control, Languages, Security, Spotlight and Notifications
- How to find System Preferences on a Mac
- How to customise System Preferences
- What you can do with General in System Preferences
- How to change Desktop & Screen Saver
- How to change the Dock using System Preferences
- Using Mission Control in System Preferences
- Languages and Regions in System Preferences
- Security and Privacy in System Preferences
- Configuring Spotlight in macOS Sierra
- Changing Notifications settings in macOS Sierra
Page 2: Displays, Energy Saver, keyboard, mouse, trackpad, printers and sound
- Mail and Messages in System Preferences
- How to configure the CD / DVD drive in System Preferences
- How to control the keyboard input using System Preferences
- How to alter the display using System Preferences
- How to configure the mouse and/or trackpad
- Printers and scanners in System Preferences
- Controlling Sound in System Preferences
- Using the Ink preferences
- Configure network settings in System Preferences
Page 3: iCloud, Internet Accounts, Extensions, Bluetooth and sharing, Network Settings, Users and Groups, Parental Controls, Dictation and Speech, Date and Time, Disk Utility, Time Machine, Accessibility
- Configuring iCloud on the Mac
- Setting up Internet accounts in macOS Sierra
- Extensions in macOS Sierra
- Bluetooth settings in macOS Sierra
- Sharing in macOS Sierra
- Network settings in macOS Sierra
- User and Group settings in macOS Sierra
- Parental controls in macOS Sierra
- Dictation and Speech in macOS Sierra
- Date and Time in macOS Sierra
- Startup Disk in macOS Sierra
- Time Machine in macOS Sierra
- Accessibility
Read: How to use settings in iOS And: El Capitan tips
Where can I find System Preferences/Settings on a Mac?

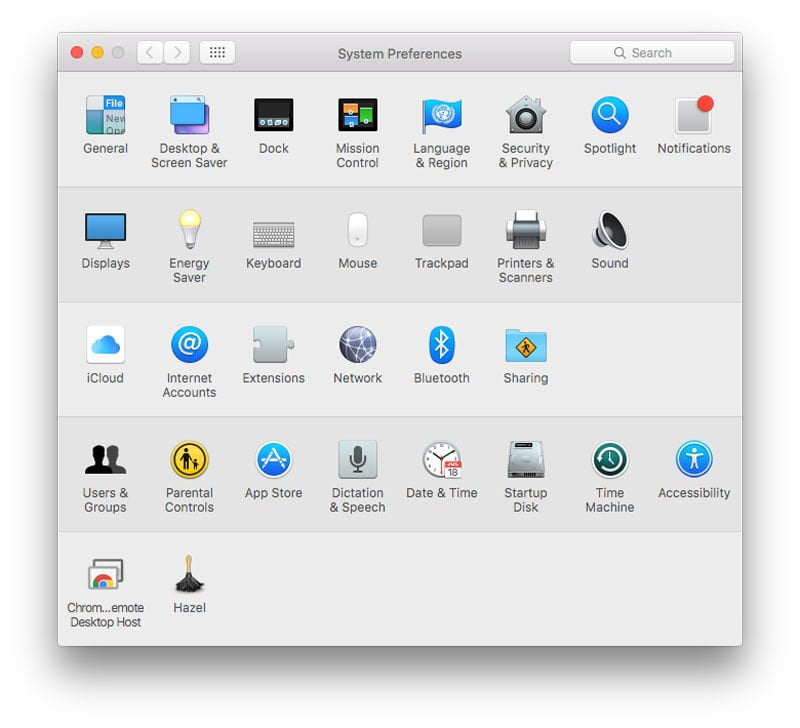
The System Preferences application is found in your Applications folder and is also available at any time from the Apple menu at the top-left of the screen (click the Apple logo). It may also be in your Dock at the bottom of the screen – it looks like the icon in the image above.
When launched, System Preferences provides access to a number of panes that deal with various aspects of how your Mac works, appears and behaves, such as screen resolutions, wallpaper images, input device shortcuts, parental control settings, and internet accounts.
Read our macOS Sierra review
Content continues below
How to use System Preferences on a Mac
When System Preferences is first launched, you’ll see rows of icons, each corresponding to a specific group of related options. Click on any icon to access the relevant pane.

Alternatively, you can access a pane if you click-hold, Ctrl-click or right-click the System Preferences Dock icon’s contextual menu, as below. At the top of the menu you’ll see the name of the currently active pane.

If you’re not sure exactly what you’re looking for, use the built-in search in the top right corner. Click in the search field (or press Cmd+F) and start typing.
As you type, the number of subjects in the results list will be filtered to match your search term, and spotlights will appear, highlighting potentially relevant panes that might offer what you require. Use the cursor keys to navigate the results list and the spotlight will become more vivid over the option you’re about to choose. Pressing Return or clicking a results list item will confirm.

How to customise System Preferences
There are two different kinds of customisation worth noting with system preferences: the panes that are installed and the panes that are visible. By default, macOS Sierra, OS X El Capitan and earleir versions of OS X will provide you with just under 30 panes (the exact number is determined by the hardware you’re using – for example, if you’ve no optical drive, ‘CDs and DVDs’ will not be shown), but third-party products may also install into System Preferences. Such panes are initially placed at the very bottom of the window.
A third-party System Preferences pane can be removed either by the pane’s own uninstaller (if it has one) or by Ctrl/right-clicking it and selecting ‘Remove…’

You can reorder the panes by using the View menu, which provides options for organising panes by category or listing everything alphabetically. View > Customize enables further changes to be made. When you select this option, checkboxes appear next to each pane. Deselect any pane’s checkbox and click Done and the pane will be hidden, but it will remain accessible from the View menu and when performing searches. Revert a pane’s visibility by using View > Customize, selecting its checkbox and clicking Done.
Read next: Which Mac do I have: How to identify model, year and serial number andHow to check your Mac’s tech specs
What does General do in System Preferences?
The General pane is a grab-bag of options related to appearance, scroll bars, document behaviour and the number of recent items shown in the Apple menu.
The Appearance menu determines the button, menu and window theme for your Mac, enabling you to switch between Blue and Graphite. This affects default buttons in dialogs, selected menu items, and also the close/minimise/full-screen buttons at the top-left of most app windows. With the Graphite theme, all of these are grey. In the Blue theme, you get the familiar ‘traffic light’ buttons at the top-left of windows and blue buttons/selected menu items elsewhere.
New in Yosemite was the Use dark menu bar and Dock checkbox. This turns the menu bar and Dock black, rather than white, to better fit in with some professional applications that have dark interfaces. This option also adjusts Spotlight’s appearance. Read: Turn on OS X’s Dark Mode
New to El Capitan was the Automatically hide and show the menu bar setting. When active, this option hides the menu bar unless the cursor is at the top of the screen, in a similar manner to how you can show and hide the Dock.
Highlight colour enables you to change the colour of highlighted content such as selected text in documents, as below. Apple provides a list of colours you can choose from, but you can define your own by selecting Other and using the standard Mac colour picker.

Sidebar icon size gives you alternate options for the size of icons in Finder’s sidebar. Medium is the default, Large is good if you find it hard to accurately click the existing icons, and Small is the best choice if you’ve a small display or like squinting a lot. Note that the setting you define here also affects the sidebar in Mail.
Show Scroll Bars adjusts how scroll bars in macOS/OS X behave. By default, they are not visible, but show automatically when you move your mouse or trackpad over them, their visual appearance in part defined by the input device. You can adjust this so that they only show when scrolling regardless of the input device (akin to how scrolling works on iOS), or always show when content is too big for the viewport. The last of those options provides much thicker scroll bars than what you usually see when scrolling; instead, their appearance is like when you hover over a MacOS/OS X scroll bar and it widens for drag-based interaction.
The Click in the scroll bar to setting changes how macOS/OS X jumps to content when you click inside a scroll bar. With Jump to the next page selected, content jumps in screen-heights or pages, in the direction of your click; with Jump to the spot that’s clicked, it instead jumps to the point in the document relative to the location clicked on the scroll bar. The first option is less abrupt but slower. If, for example, you were looking at the top part of a very large list in Finder and then clicked the bottom of the scroll bar, Jump to the next page would take several clicks to reach the bottom of the list, but with Jump to the spot… it would take only one.
The Default web browser menu is a setting that usually exists in a browser’s preferences, but you can now define in System Preferences whether Safari or another browser should launch when you, for example, click a link in an email.
The next group of options deals with document behaviours. Ask to keep changes when closing documents and Close windows when quitting an application do much as you’d expect. In the former case, it’s worth noting that changes are automatically saved when documents are closed: by turning on this option, you instead get the choice regarding whether to save the changes or revert the document to how it was when last opened. If you leave Close windows… unchecked, open documents should reappear as they were when you last closed an application. Check this option and applications will launch without any open documents, unless they have their own built-in settings to override macOS/OS X’s default behaviour.

The Recent items option defines how many items appear in the Recent Items menu in the Apple menu. By default, up to 10 of each type (applications, documents, servers) are shown, but other options are provided. Note that any setting chosen also affects recent-item Dock stacks. You can create one of those by typing the following in Terminal and then hitting Return:
defaults write com.apple.dock persistent-others -array-add ‘{ “tile-data” = { “list-type” = 1; }; “tile-type” = “recents-tile”; }’ ; killall Dock
Allow Handoff between this Mac and your iCloud devices determines whether the Mac has the capability to send/receive in-progress documents to/from iCloud devices running compatible versions of macOS, OS X or iOS. Unless you’ve a compelling reason to turn it off, don’t.
Finally, the LCD font smoothing option makes text appear in a slightly more pleasing manner in macOS/OS X. Again, there’s no compelling reason to turn this off, so we suggest you leave it on.
Have some geeky fun with these Terminal tricks and projects for the Mac
System Preferences: Desktop & Screen Saver
The Desktop & Screen Saver pane in System Preferences is where you adjust your desktop background image and/or the screen saver that kicks in after a user-defined period of time.
Switching the desktop image doesn’t in fact require a trip to System Preferences. In Finder, you can Control-click any compatible image and choose Set Desktop Picture (in the Services sub-menu); similarly, Control-click an image in Safari and you may be able to select Use Image as Desktop Picture, depending on how the site is set up. However, the System Preferences pane provides a much greater degree of control, along with a central area to access collections of images. (You can also access this pane by right clicking on your desktop and choosing Change Desktop Background.)
In System Preferences > Desktop & Screen Saver click the Desktop tab to access desktop settings. This will display a thumbnail of the current background image, alongside which will be its title. From the pane on the left, you can select collections of images. By default, you’ll see two under the collapsible ‘Apple‘ list (Desktop Pictures and Solid Colors), and your iPhoto and/or Photos albums appear under relevant headings. The next item is a collapsible list called Folders, to which you can add custom folders by using the + button. (Sneaky tip: Apple includes a bunch of folders in /Library/Screen Savers/Default Collections, which are otherwise only used for screen savers. They’re worth adding if you like wildlife, space and landscape shots.)

To change the desktop background, select a collection and then click any of the images within. Alternatively, you can drag an image to the well from Finder. (Dragging from Photos doesn’t work, but you can use the Share button in that app to set a selected item as your desktop image.) If the image is of a suitable size and aspect ratio for your display, it will be resized automatically. If not, a menu will appear enabling you to define whether the image should fill the screen, fit to the screen as best it can, stretch, be centred, or tile.
It’s also possible to have your desktop background change at regular intervals. To do this, select a collection and then tick ‘Change picture’. In the pop-up menu, define how often you’d like the background to change; options provided range from 5 seconds to daily, along with login/wake-up. If necessary, define how the images will fill the screen using the aforementioned pop-up menu. Your desktop background will at the appropriate times subtly cross-fade to the next image in the collection; if you instead want each change to be randomised, tick ‘Random order’.

In OS X Mavericks, there was a lumped-in option to disable the translucent menu bar, turning it a solid light grey. This disappeared from OS X Yosemite, which moved transparency settings to Accessibility > Display, where they remain in El Capitan and macOS. This is a useful option for increasing legibility.
Change and manage your screen savers on a Mac
Click Screen Saver to access the screen savers pane. To the left is a selection of built-in screen savers; select one to choose it as the currently active screen saver (or choose Random to have one be selected at random whenever the screen saver is activated), and use the Start after menu to determine how long your Mac remains idle before the screen saver starts. Optionally, a clock can be overlaid on the screen saver, by checking Show with clock.

Depending on the screen saver chosen, you may get options. For the various photography-based screen savers, you’ll see a Source menu, enabling you to define a source folder of photos to use. On choosing a new source, the screen saver preview will update accordingly. Checking Shuffle slide order randomises the presentation from the selection of images.
For other screen savers, you’ll get a Screen Saver Options button that when clicked provides in-context settings for that particular screen saver. For example, Apple’s own Flurry enables you to adjust how many streams of colour appear on the screen, how thick they are, and how fast they move.

To the bottom-right of the pane is a Hot Corners… button. The options are shared with Mission Control and provide the means to trigger various macOS functions when you move the cursor into a screen corner. The first option is Start Screen Saver, and is a very quick means of activating the screen saver. This can be especially useful if you’ve also used the Security & Privacy pane to demand a password be entered to exit the screen saver.
It’s also possible to install third-party screen savers. Once installed, these appear below the built-in options. If you later decide you want to delete a screen saver, Control-click it and select Delete.

Change the Dock using System Preferences
Many of the Dock’s preferences can be adjusted by Control-clicking the thin line that divides apps and folders and choosing from the various options. However, the Dock pane in System Preferences is worth exploring, because it provides a very clear visual overview of all your Dock’s settings.

Size and Magnification determine the size of the Dock icons and how much they expand when the cursor is over them. Magnification is best used when you’ve so many Dock icons that they’re not easy to pick out unless zoomed; if you don’t like the effect, you can disable magnification entirely.
Position on screen determines the screen edge the Dock sits on. Under OS X Mavericks, the Dock displayed as a flat rectangle at the left or right edge, and as a metal shelf at the bottom of the screen. Under OS X Yosemite, the Dock became a semi-transparent rectangle.
The Minimize windows using menu provides two effects for when windows are minimised to the Dock: Genie and Scale. The former appears to ‘suck’ the window into position, whereas the latter is a much simpler zoom that’s less taxing on older Macs and also a lot faster.
Read: 12 Tips for using the Mac Dock

New to macOS Sierra is the ‘Prefer tabs when opening documents’ menu. This enables you to state whether new documents should always open in tabs, open in tabs only when an app is in Full Screen mode, or only open in tabs manually (the default). Note that not all apps are compatible with tabs. Those that aren’t ignore this setting.
The remaining options adjust various behaviours of the Dock: Double-click a window’s title bar to… enables you to select between zoom and minimise when making that action; Minimize windows into application icon sends minimised windows to the relevant app icon in the Dock rather than to the Dock’s right-hand side; Animate opening applications makes apps bounce while launching;Automatically hide and show the Dock makes the Dock disappear from view when not in use, and demands you move the cursor to the relevant screen edge to show it; and Show indicator lights for open applications places a little black dot beneath the icons of apps that are currently running.
Using Mission Control in OS X
The Mission Control pane is the place for adjusting how Apple’s window overview works. On newer Macs, F3 is a Mission Control key — press it and you see all your open windows (in OS X Yosemite these were grouped by app and badged with the relevant icon, icon; as of OS X El Capitan, the older Exposé behaviour returned and you can see all your open files at once). In this screen, you can also create multiple desktops (which Apple refers to as ‘Spaces’) that you can switch between.

In the System Preferences > Mission Control pane, the first five options determine aspects of how Spaces appear. The first option rearranges spaces based on recent usage, rather like the Command+Tab app-switcher. The second option when active automatically switches you to a space with an open window for an app when the app itself is switched to.
The next two options set whether windows are grouped by application (turn that on and Mission Control groups app windows alongside the app’;s icon), and whether displays have separate spaces. With the latter option active, distinct workspaces can be created for each of your displays. (Apple also notes that should you at any point need to have a single app window span multiple displays, you should turn offDisplays have multiple Spaces.)
Finally, the Dashboard menu enables you to set Apple’s ‘widgets’ screen as a space, as an overlay, or turn it off entirely. As an overlay, you’ll need to click the Dashboard app icon or use a keyboard shortcut – F12 by default – to activate it. Note that much of Dashboard’s functionality now exists within Notification Center’s Today view, so see if that works for you before turning Dashboard back on.
The second section, titled Keyboard and Mouse shortcuts, provides a centralised area to define shortcuts for activating Mission Control and the ‘Application Windows’ feature (which shows only the windows of the currently active app), and showing the Desktop or Dashboard. For any keyboard shortcut, you can define a function key or a modifier (a specific Shift, Control, Option or Command key), although the latter option isn’t usually a good idea, because it makes the chosen modifier unavailable elsewhere. You can, however, combine a modifier and a function key: for example, to set Shift+F1 to activate Mission Control, hold Shift, open the Mission Control menu, and click F1.
It’s worth noting that if your Mac keyboard includes a Mission Control icon on its F3 key, modifiers can be used in conjunction with that key in order to access Mission Control functionality: Command+F3 shows the Desktop, and Control+F3 activates the ‘Application Windows’ feature.

Finally, The Hot Corners button has been mentioned previously in our overview of System Preferences, and it works identically here — any one of the four screen corners can be used as a trigger for Mission Control, ‘Application Windows’, showing the Desktop, or opening Dashboard (among other commands, such as showing Notification Center or Launchpad). Reverting any of the menus to the ‘-‘ option deactivates the hot corner entirely.
How to set the Language & Region in System Preferences
This pane controls the language shown in menus and dialog boxes, and the formatting of dates, times and currencies. It will by default use the language you stated you wanted to use when you set up your Mac, along with the most appropriate formatting for your location.

You can add or remove languages from the Preferred Languages list by using the + and – buttons. On adding a new language, macOS will ask whether you want to use it as your primary language. If you confirm this is the case, it will be moved to the top of the list, and dialog boxes will change to the selected new language. The addition of a new language will also add a ‘List sort order’ menu, which you can use to adjust how names are sorted in Finder, if a language offers an order other than the Universal default. Some other aspects of macOS may require you to logout and login for changes to fully take effect.
To the right of the Preferred Languages list, you can update your region setting using the Region menu. If you change it (for example, switching between United Kingdom and United States), you’ll see how other settings are automatically updated to match the region’s conventions. Should you want to, specific elements can be overridden, using the menus: the first day of the week, the calendar used, and whether the time format is 24-hour; and whether the temperature is displayed in Celsius or Fahrenheit. With Time format unchecked, the macOS clock will use the 12-hour format typically preferred in the USA.
Any elements adjusted here may impact on apps elsewhere in macOS although some apps also have their own internal settings for certain things, and so you cannot rely on your System Preferences changes to always filter through.
The two buttons at the bottom of the window are Keyboard Preferences and Advanced. Keyboard Preferences takes you to the Input Sources tab within the Keyboard System Preferences pane, where you can define keyboard types for your machine (for example, adding one that’s more suited to a particular language you often work in). Advanced opens a sheet that provides the means for editing a number of more detailed display options for your chosen region.

For the most part, these settings should be left alone, but if you have very specific set-up needs, they’re worth investigating. Under General, you can change the format language for dates, times and numbers, and the number separators used for grouping and decimals. English uses, respectively, a comma and period for grouping and decimals (for example, 1,000.00), but if you’re working in a language that uses something different, you can adjust the relevant settings here; similarly, currency and its relevant grouping/decimal options, can be defined, along with default measurement units for the system (Metric or US).

The Dates and Times tabs both offer a set of fields where you can drag individual date or time elements to design custom formatting. In Dates, for example, the ‘short’ date on a British English system would read 05/01/2014 for the fifth of January, but you can adjust this to suit your own preferences, add elements (such as the era or specific characters) or remove them entirely, clicking OK when done.
Be aware that changes made here can impact on apps throughout the system, and making major adjustments can have unintended consequences. If you decide you’d like to return to OS X’s system defaults, go back into the relevant tab and click Restore Defaults (which is initially greyed out, but becomes a clickable button when any changes are made). At any point, when you return to the System Preferences pane, you’ll see a brief overview of your settings under the Temperature or List sort order menu, depending on whether you have the latter visible.
How to set up Security and Privacy in System Preferences

When it comes to System Preferences panes, Security & Privacy is perhaps the most intimidating; it’s therefore no surprise many Mac users avoid it entirely. However, it’s crucial to understand the settings within, especially when you work with apps that require control over your computer, or if your Mac happens to be in a fairly open or public environment. In order to make changes to the settings within this pane, you’ll likely have to click the padlock and input an admin username/password. Read: How secure is Mac OS X?
The first tab is General. The settings here are broadly split into two sections, the first dealing with logins and the second with the ability to install downloaded apps.

You can use the Change Password button to alter the password for the currently logged-in user. Click the button and you access a sheet, into which you type the old password, then the new one and a recovery hint; clicking ‘Change Password’ confirms.
Note that should you be using an iCloud password to login on versions of OS X that allow this (macOS Sierra does not), you’ll get a dialog that gives you options to use a separate password, cancel, or change your iCloud password.
The three checkboxes are designed to secure your computer during your absence. The first when ticked makes it so your login password is required to exit sleep or the screen saver; the time limit can be set to one of seven pre-set values, including ‘immediately’ and the likes of ‘5 seconds’, to ensure you aren’t forced to input your password if you accidentally trigger the screen saver yourself. Note that if you later disable this option, your Mac will warn you and ask whether you want to carry on using iCloud Keychain.
The next checkbox enables you to add a message to the lock screen for anyone who tries to login while the screen saver’s running. The third checkbox enables you to disable automatic login, and requires you to define a default account for the Mac, along with inputting the relevant password.
Read: Best Mac antivirus software.

The second section within the pane determines what types of app the user can download and install. This defaults to App Store and identified developers; leave the setting alone unless you’ve compelling reasons to change it — for example, installing a very trustworthy app that just happens to not have been released by an identified developer. Under such circumstances in OS X El Capitan, change the setting to ‘Anywhere‘ and then back again post-install, for best security. In macOS Sierra, the Anywhere option is absent. However, you can launch unsigned apps in Finder by Control-clicking them and choosing Open.
The next tab is FileVault. This automatically encrypts your data -8 in fact, it encrypts the entire volume. With FileVault active, a password is required when booting the Mac to unlock the drive. Without the account password (or a recovery key provided during set-up), you’ll permanently lose access to your data, so take care if you decide to use FileVault! Read how to change the admin password on your Mac.

Turning FileVault on is simply a case of clicking the sole button on the pane. Note down the recovery key, and you can also optionally enable the key to be stored with Apple, guarded by security questions. The drive encryption process can take minutes or hours, depending on the size of the drive and the data on it.
Note that FileVault is only protection for your data when the Mac’s turned off. When you’re logged in, it does nothing, and so is best used in tandem with the previously mentioned password for exiting sleep or the screen saver. If using FileVault, you should also encrypt back-ups in the disk-selection sheet of Time Machine.
To later disable FileVault, click the ‘Turn Off FileVault’ button in the FileVault tab.

The Firewall tab is for activating and tweaking your Mac’s firewall, designed to prevent unauthorised apps, programs and services from accepting incoming connections. Click ‘Turn On Firewall’ to turn it on, and then ‘Firewall Options’ to configure it. In the pane, you can allow or deny incoming connections for listed items or add your own using the + button. By default, signed (trusted) software can receive incoming connections. You can also enable stealth mode, which means your Mac won’t respond to any attempts to access it from uninvited traffic.
It’s worth noting that if you’re on a private home network, chances are your router already has a hardware firewall that’s on and in use; firewalls are generally more important when on public networks. However, it’s also unlikely to cause any major performance issues if you do activate the firewall. Should you have connection issues from other devices or to/from online services, it’s worth investigating whether the firewall is the cause, though.

The Privacy tab is for defining which apps have access to certain services. Such requests are made for various reasons: for example, a calendar app might require access to your calendars in order to work; additionally, apps that control the computer (such as window managers and launchers) will need the means to do so, and permission is provided in the Accessibility section within this tab. There’s also a Location Services section, for apps that want to determine your location.
In all cases, select from the list on the left and use checkboxes on the right to determine the apps that have access to the relevant service. Only deny access for an app you no longer use or that you’re certain you no longer want to communicate with the item it requested access to. You can of course change your mind later if you find functionality on your Mac impaired by any decision you make in this tab.

Finally, at the foot of the page is the Advanced button. Click it to open a sheet with yet more options for securing your Mac: the means to log out after a defined period of inactivity; a requirement for an administrator password in order to access system-wide preferences that have been locked; and a setting for disabling commands from an infrared receiver. The Pair button can be used to pair the computer with an available remote.
How to change Spotlight settings in System Preferences
The Spotlight System Preferences pane enables you to define the kind of results that appear in Spotlight, along with the content Apple’s search system happens to index. You can also amend the shortcuts used for Spotlight, by clicking ‘Keyboard Shortcuts…’, which takes you to the Shortcuts tab in the Keyboard pane within System Preferences. (Note that when changing shortcuts for Spotlight, ensure your choices do not clash with commonly used shortcuts elsewhere. You’re most likely to need to amend the Spotlight shortcuts if you often work with multiple languages. Command+Space is also used by default to switch input sources.)

As of OS X El Capitan, it’s no longer possible to reorder search results categories. Spotlight alone now determines relevance. However, you can still omit entire categories by unchecking their checkboxes. Note that some options require an internet connection. For example, if you’re not online, you won’t be getting Bing Web Searches, results from the iTunes Store, or live currency conversions.
Underneath the scrolling categories pane is the option Allow Spotlight Suggestions in Spotlight and Look up. This is a switch for Spotlight’s capability for accessing smart results, such as sports scores, and those based on location, including nearby restaurants, cinema times and weather reports. Disable the option and these kinds of results will not be available. [Apple notes privacy implications for Spotlight Suggestions on its website], if you’re concerned about your search data being sent to various online services.
Read: Tips for using Spotlight in Mac OS X.

Click the Privacy tab and you can prevent Spotlight from searching specific locations. To add a folder, click + and then choose the location from the sheet that appears. Note that you can block entire volumes/drives from being searched by selecting the location drop-down menu and going up to its top level, which includes any attached drives. In particular, we strongly recommend adding any drives that include back-up clones taken with the likes of Carbon Copy Cloner or SuperDuper! This is because otherwise Spotlight may return multiple results for essentially identical objects, and you might end up opening the wrong document in error (as in, the one from a back-up drive), editing and saving it, only for it to be overwritten during the next back-up. You can also drag items from Finder to this list; to later remove any item, select it and click the – button.
Read: 8 great alternatives to Finder and Spotlight on the Mac.
How to change Notification settings in System Preferences
The Notifications System Preferences pane provides the means to manage and tame macOS Sierra’s notifications system, which can be very helpful but also a huge distraction if you’ve loads of notifications coming in all the time. Read more aboutNotification Centre on the Mac.

The first option is Do Not Disturb. Select that and you can define a time period when notifications won’t bother you. Optionally, you can also turn on Do Not Disturb when mirroring your Mac’s display to a TV or projector, which is likely to occur when watching a film or during a presentation. Note that when Do Not Disturb is active, the Notification Center icon at the far-right of the menu bar will turn grey. Your System Preferences settings can be manually overridden at any point by opening Notification Center and flicking its Do Not Disturb switch.
Below Do Not Disturb in the sidebar, you’ll find a list of apps.
Select an application and you’ll get a set of options, and the default settings are designed to best suit the specific application they belong to; however, they’re worth investigating, especially if you’re getting deluged with notifications.
The first section defines the alert style, from which you can pick None, Banners (which appear in the upper-right corner and vanish after a few seconds) and Alerts (like banners, but require a user action to dismiss them). Simply click an option to select it, and its title will take on a blue lozenge as its background.

Below, you’ll see up to four options. ‘Show notifications on lock screen‘ defines whether notifications will appear when the Mac is locked, and is worth disabling on public Macs. Show in Notification Center allows you to adjust how many items for the app are displayed: 1, 5, 10 or 20. For the likes of Calendar, showing upcoming events, you might want a longer list, but the item number for many apps can be reduced without impacting your workflow.
The Badge app icon option determines whether a red badge appears on an app’s icon when notifications occur (for example, unread emails for Mail). ‘Play sound for notification‘ will make a noise when a notification appears.
Mail and Messages have an additional option: Show message preview, and this can be set to ‘when unlocked‘ (the default) or ‘always‘; the second of those is not recommended for Macs in public places, unless you don’t mind anyone potentially seeing a preview of your incoming messages. Twitter also has an additional option, a Notifications button that enables you to fine-tune what type of Twitter communications macOS Sierra notifications are displayed for; by default, Direct Messages are included, but you can also be notified about mentions and replies from people you follow or anyone who happens to contact you.
At the bottom of the window, there’s a sort menu. You can set this to sort your notifications by recent notifications (Recents), recent notifications by app (Recents by App), or Manually by App. Bafflingly, there’s no alphabetical sort option.

Although macOS Sierra has yet to get quite as notification-happy as iOS, we recommend taking some time to manage this section of System Preferences. Turn off banners and get apps out of Notification Center if you don’t need notifications from them; and for those things you do need notifications from, minimise them whenever possible. If you’re easily distracted but get a lot of email, for example, it’s a smart move to stop Mail notifying you with a banner every time a new message comes in, but you could always leave the app icon’s badge setting active, to provide an at-a-glance indication of how many unread emails you have.
[Source:-Mac world]