The error message “Missing operating system” occurs when the computer is unable to locate an operating system in your system. This usually occurs if you have connected a blank drive in your computer or the BIOS is not detecting the hard drive. It can also occur if the hard disk is damaged or the sector 0 of the hard disk drive has an incorrect master boot record (MBR).
This can also occur if an incompatible partition is set as an active partition or when a partition which contains the MBR is no longer active. Users also face this problem when they are booting from the wrong location where there isn’t any operating system present. We will try to recover your system before we resort to doing a clean install of Windows.
Missing operating system
Users face this issue in all versions of operating systems namely Windows 10, 8, and 7. The computer manufacturers where their product contains the error include Dell, Lenovo, HP, Sony VAIO, Acer etc. This issue is usually fixable without much hassle. We will start with the easiest solution and work our way down to more complex ones.
Note: Before you proceed, you should make sure that the hard drive you are using does indeed have an operating system. If you are using a new hard drive, it will not have an operating system preinstalled. First be absolutely sure that the operating system is present and then proceed. Also, remove all additional hard drives and flash drives before proceeding. These are known to conflict with BIOS when booting your computer.
Solution 1: Selecting the correct Boot Device
Normally, users experience this issue if the proper boot device is not selected on their computers. It might be selected as a USB device or a CD. If an operating system is not present in them, your computer might throw this error and refuse to load the correct operating system present in the hard drive. We can select the correct boot device and see if the error still persists.
- Open your computer and press F1, F2, or F3 upon startup to enter the BIOS. The key might be different for each computer according to the manufacturer.
- Once in the BIOS, navigate to the boot options and select the Hard drive from the list of boot devices and bring it to the top.
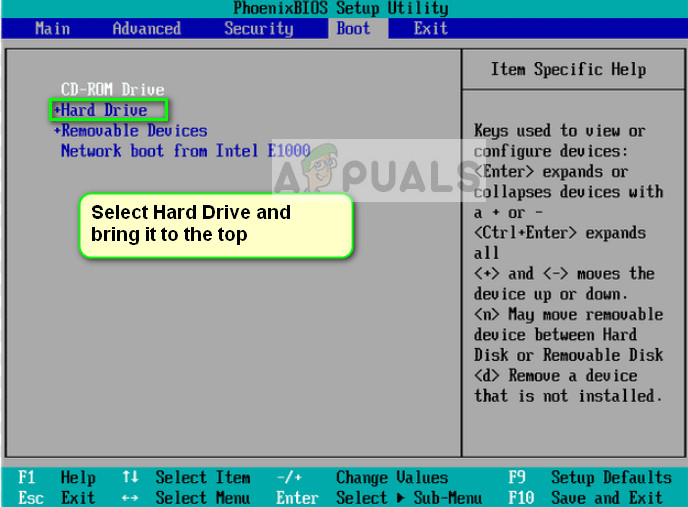
- After selecting the correct boot device, restart your computer and check if you successfully load your Windows.
Solution 2: Rebuilding BCD
The Boot Configuration Data (BCD) contains a list of all the items which are supposed to run at startup. According to Microsoft’s official documentation, you can experience boot errors if you have damaged or incomplete files in your BCD or if your BCD is inactive or wrongly selected by the system as mentioned above. We will try rebuilding the BCD and see if this does the trick.
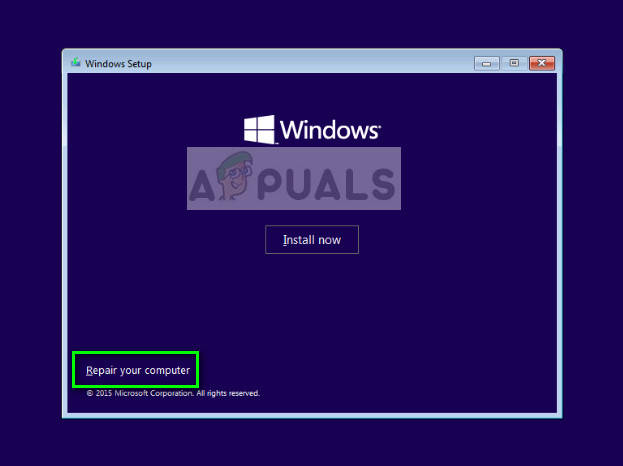
- Insert a bootable device with a copy of Windows in your system and click on Repair your computer present at the bottom left side of the screen.
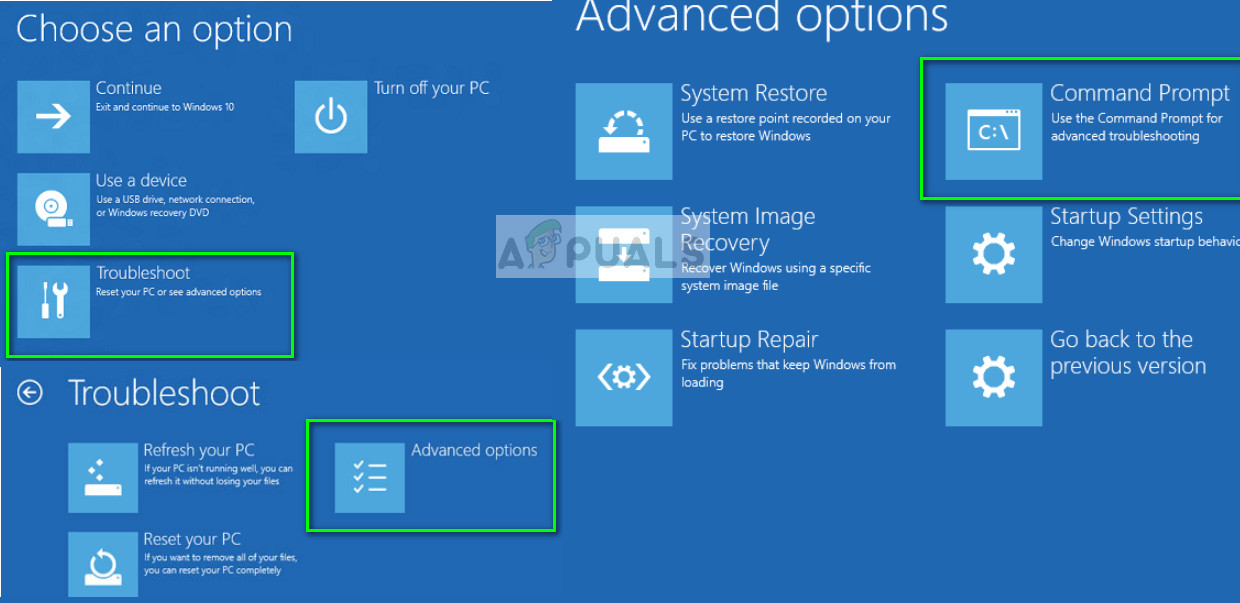
- Once in the recovery environment, click on Troubleshoot > Advanced options > Command prompt.
- Once in the command prompt, execute the following command:
bootrec /rebuildbcd
- After the command is executed, restart your system properly and check if the issue is solved.
Solution 3: Activating primary partition
As officially corresponded by Microsoft, it is possible that your primary partition is not marked as active by the system which is causing the error message under discussion. We can boot into RE using the method above and forcefully activate the partition. When we reboot, the computer will detect the operating system in the partition and boot from it.
PRO TIP: If the issue is with your computer or a laptop/notebook you should try using Reimage Plus which can scan the repositories and replace corrupt and missing files. This works in most cases, where the issue is originated due to a system corruption. You can download Reimage by Clicking Here
- Enter the command prompt using the method we implemented in the last solution.
- Once in the command prompt, execute the following command:
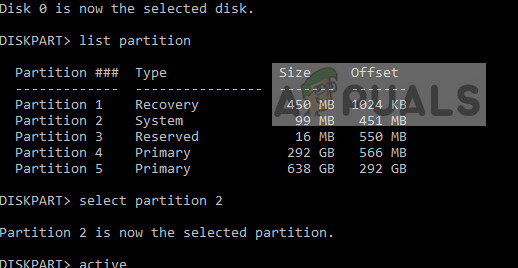
diskpart
- Once you are in disk part, enter the following command:
list disk
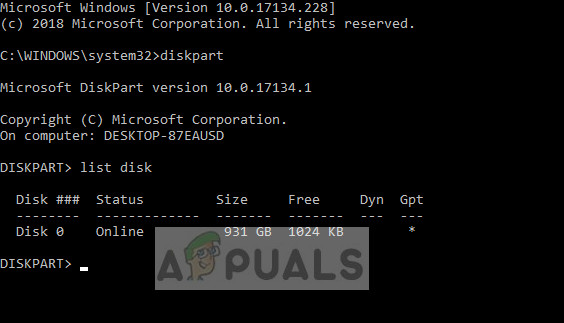
- Now select the disk where you have installed Windows. In this case, it is ‘disk 0’. Execute the following commands:
select disk 0

list partition
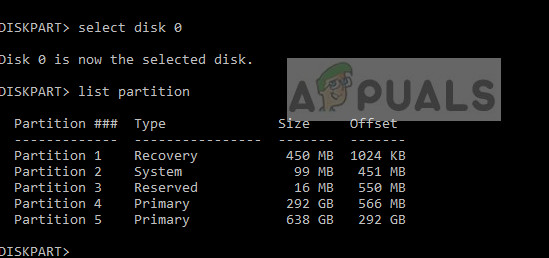
- Here all the active partitions will be listed. Select the partition of “System reserved partition”. We will activate it to make sure that all the essential information is available to the BIOS. Enter the following commands:
select partition 2

active
- After activating the partition, restart your computer and check if the issue is solved.
Note: You should also make sure that all the other partitions are also working properly and are not deactivated.
Solution 4: Checking your hard drive connection
If the above methods don’t work, you should check your hard drive connection to your computer. If your hard drive is not connected properly, it might not get detected and the operating system will fail to load.
If you are using a Desktop computer, make sure that the hard drive is connected properly with the SATA connection. Try unplugging it and plug it in again correctly. Also, try using other SATA ports for the connection.
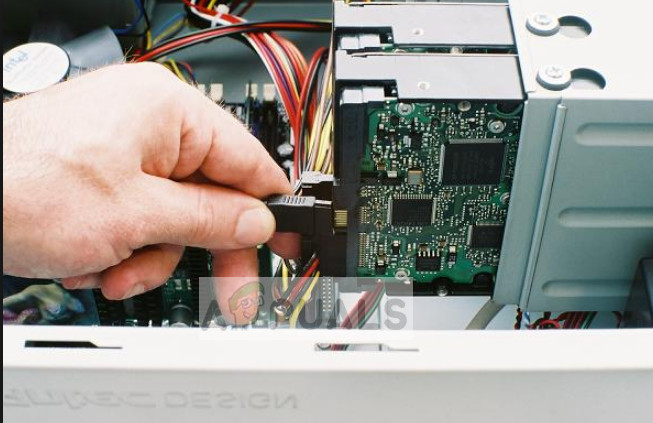
If you use a laptop, you have to unscrew the back of the computer and look for the hard drive connection. Make sure it is connected properly in place and try re-plugging it and remove any dust. Once you have made sure that the hard drive is connected, restart your computer completely and check if the issue is solved.
Solution 5: Changing SATA mode and using USB 2.0
If you were reinstalling a fresh copy of Windows, it got stuck in the middle and now you are receiving the error “Operating system not found”, it means that the system is unable to properly recognize the OS and fails to install it.
Although this condition might vary case to case, you can try changing SATA mode using the BIOS settings.
- Enter your BIOS by pressing the correct key (F1, F2, F3 etc.).
- Once in the BIOS settings, navigate to Storage Configuration and change the setting to/from AHCI.
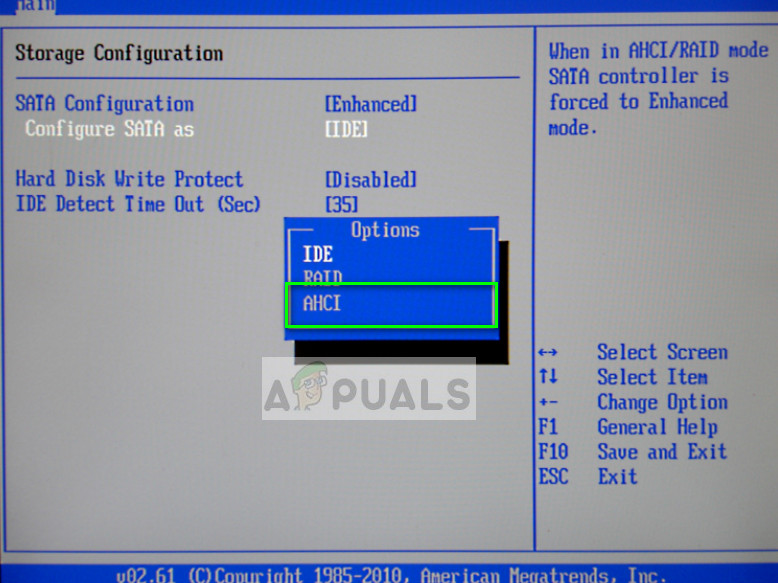
- Once you have changed the option, make sure that you plug in your removable media in a USB 2.0 port. There are known issues when you plug in your installation media in the 0 port.
- Restart your computer and try installing/restoring Windows again and see if the issue is solved.
Solution 6: Installing a new Windows
If all the above methods don’t work, you can try installing a new copy of Windows in your machine. This will probably erase all the data in your primary windows installing partition and reset everything including the applications. You can try a data recovery before proceeding with this solution.
To perform a clean installation of Windows, you need to download Windows from the website and then create a bootable media. You check our article on how to create a bootable media. There are two ways: by using media creation tool by Microsoft and by using Rufus. You can easily install Windows using the bootable media.
TIP: If none of the Methods have resolved the issue for you, we recommend using Reimage Repair Tool which can scan the repositories to replace corrupt and missing files. This works in most cases, where the issue is originated due to a system corruption. Reimage will also optimize your system for maximum performance. You can download Reimage by Clicking Here
[“Source-appuals”]