Even though CraftUnique is one of the newest 3D printer makers to enter the market, its first CraftBot machine received rave reviews right out of the gate.
In August 2014, the Budapest-based company ran an Indiegogo crowdfunding campaign for its CraftBot 3D printer that garnered nearly a quarter of a million dollars — six times its goal — in a month.
Once it shipped to buyers, the Craftbot was rated the top budget 3D printer by service provider 3D Hubs’ global user community, based on more than 5,300 reviews by vetted 3D printer owners.
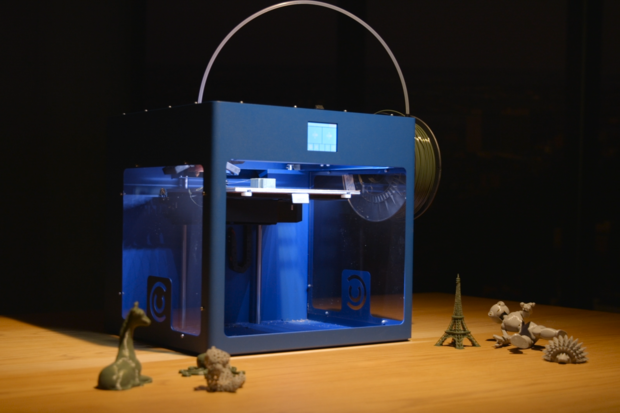
The second-generation model, the CraftBot Plus, which came out last year, tweaked what was already considered a great 3D printer. So I was excited to dive in and start printing some of my favorite models to see if the machine would live up to its hype.
The CraftBot Plus is 16.1 x 14.1 x 14.9 in. and weighs just 30 lbs., which means it’s not only easily transportable but also won’t devour a lot of desktop space. It has a print area of 10 x 8 x 8 in., a large build volume in relationship to its small desktop size. It can be used with any Windows, OS X or Linux-based system.
The printer comes in six colors and retails for $1,099 (vendor price). It uses the popular PLA and ABS thermoplastics as well as high impact polystyrene (HIPS) filament; it will use any standard 1.75mm diameter filament from any manufacturer. CraftUnique sells its filaments in a myriad of colors: $29 for a 2.2-lb. reel.
First impressions
Straight out of the box, the CraftBot felt and looked sturdy and well constructed. The all-metal body and stainless steel screws that line the edges of its frame give it an industrial feel, but its simplistic design makes it user friendly. This is a no-frills printer — just the way I like them.
I found the CraftBot simple to set up; it didn’t even come with oodles of Styrofoam packing or plastic braces for its print platform, which other 3D printers require you to remove before you can print. The only things that required removal were some rubber bands wrapped around the print bed to hold it in place.
The next step for setup was to mount the filament guide tube and filament spool holder, both of which require a single screw to attach to the side of the printer.
Lastly, you’re required to download CraftWare slicer software. Slicer software is used universally by 3D printers; it takes your digital 3D object and turns it into a G-Code language format understood by most 3D printers.
LCD menu
The CraftBot’s 2.8-in LCD color touchscreen is impressive. While it’s a resistive touchscreen rather than a capacitive one (which enables a far lighter touch, similar to a smartphone or tablet), the screen is fast and responsive. It uses both images and descriptions of functions to help you navigate the system.
When it comes to beginner-level to intermediate 3D printers, simple is the name of the game. Anything too difficult to decipher will ultimately keep users from discovering the full potential of the machine. I found the CraftBot’s touchscreen menu’s usability and functionality just right.
With the LCD menu, you can perform critical functions. You can load and unload filament, and manually raise or lower the print bed, level it and pre-heat it. You can also turn lights and cooling fans on and off. And you can use the menu to select objects to print from an inserted USB thumb drive.
The CraftWare software
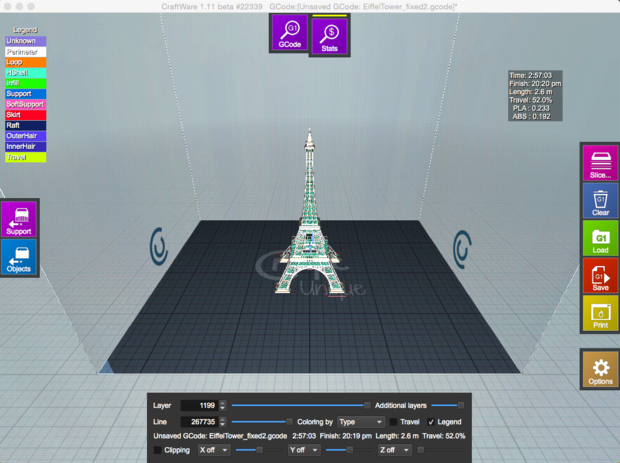
The main functions of the CraftBot, however, are contained in CraftUnique’s CraftWare software, which is still in beta.
I was struck by CraftWare’s simple user interface. Like the latest iterations of Microsoft Windows, CraftWare uses tile icons for its functions, which were refreshingly easy to use and yet offered some sophisticated tools.

CraftWare’s Options menu enables a good deal of object manipulation on the virtual print bed. For example, you can choose the size of your print bed area, which restricts the size and number of objects you can print at one time. You can also choose the display mode — whether you want an object to display as transparent or solid. The menu has a handy undo feature to remove any previous changes you may have made to a model.
In the Slicing menu, you can select your print materials, enable automatic scaffolding support, add a raft (base) to the object and indicate whether you’re printing with PLA or ABS thermoplastics. You can also select Expert mode, which enables more than a dozen fine adjustments to your print job, such as choosing the layer thicknesses — from 10 to 200 microns.
You can choose to create objects stored in four file types: .CWPRJ, .CWSP, .STL and .OBJ. The menu also allows users to set auto functions, such as checking for software updates and sharing statistics from print jobs with CraftWare.
Best of all, the speed with which CraftWare slices objects (i.e., turns them into multi-layered models that can print) is stunning. No matter the complexity of the model I was building, the CraftWare sliced it in just a few seconds. Some machines I’ve used in the past could take minutes, even tens of minutes, to slice an object.
One function that did not impress me was CraftWare’s method of manipulating the virtual models prior to printing. Rotating objects and then setting them down on the virtual platform was often an arduous experience that left me with inaccurate placements.
In addition, the CraftWare software hung up quite often. Once a model was loaded, the software would freeze up and it could take from several seconds to more than a minute before I was able to save an item or rename a file. There were also several times when I had to use the Force Quit command on my laptop to get out of CraftWare. It wasn’t an insurmountable problem, but it was annoying at times.
The heart of CraftBot lies in its electronics, with a dual ARM Cortex M3 MCU that allows a user to interact with the printer quickly. Unfortunately, I was unable to upload models from my laptop to the 3D printer because my computer uses the latest version of OS X Yosemite (10.10.5), which is not yet supported by the CraftBot. CraftUnique said it is working on updates.
Print tests
My first print job was of a 4-in. tall giraffe — an .STL file provided by CraftUnique on a thumb drive. It printed in under an hour, but it didn’t have a great deal of detail, so I moved to more challenging print jobs.
My next print job was my standard: The 5-in. tall Eiffel Tower, a challenge for any fused filament fabrication 3D printer with all of its intricate latticework.
On my first print of the tower, I used .1mm-thick layers to see how fine a detail the machine could produce. While it successfully completed the print, it was unable to replicate some of the finer details of the tower, such as the inner crisscross supports.
Next, I attempted the tower using a .2mm layer thickness. The thicker the layers, the faster the print — and this machine is fast. It was able to print the tower in one hour and 40 minutes. It basically matched the time of the LulzBot Mini, which previously had been the fastest 3D printer I’d tested.
The CraftBot, however, was not able to match the LulzBot in accurately reproducing the Eiffel Tower intricate latticework.
But although nowhere near perfect, the CraftBot was able to reproduce the Eiffel Tower with decent accuracy the second time around, getting much of the crisscross lattice patterns correct.

While CraftBot’s second Eiffel Tower print job came out better than the first, I still found a gossamer film of spider web filament between latticework, which made for a bit of a sloppy appearance. It just wasn’t as accurate as the LulzBot Mini.
Admittedly, the LulzBot Mini retails for $1,350, which is $251 more than the CraftBot. Additionally, the LulzBot Mini has a smaller build area at 6 x 6. x 6.2 in., compared with the CraftBot’s 10 x 8 x 8 in. build area.
Whisper-quiet
When I started my first print job, I was struck by how whisper-quiet this machine is, a fact made even more evident by the last 3D printer I reviewed; it was so loud my co-workers complained about the noise.
Simply put, the CraftBot Plus is a pleasure to sit next to as it prints — no loud squeaks or churning noises as the extruder head navigates the print bed. As the number of my print jobs increased, the printer began to squeak and churn a bit more, but the noise was nowhere near as loud as I’ve experienced with other machines. I’m guessing with a bit of oil in the right places, the machine would have returned to its former silent self.
Printer bed issues
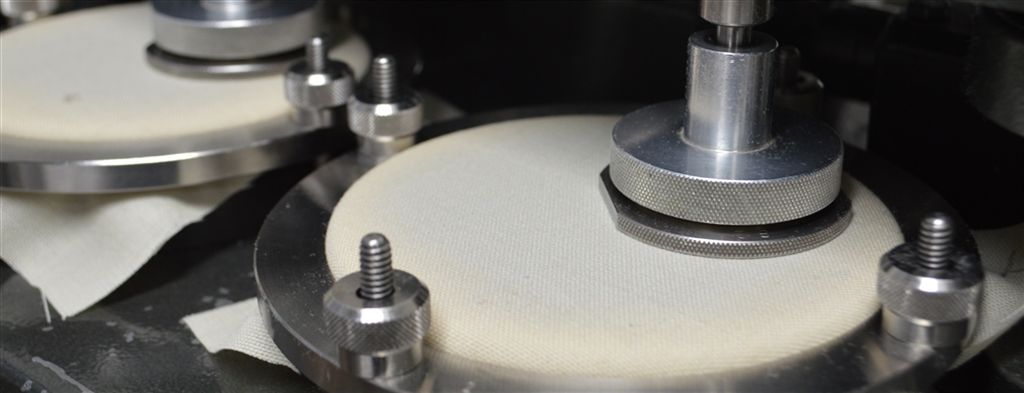
One deficiency CraftUnique said it corrected with the second iteration of its 3D printer was print bed heating problems (the print bed heats up to 140 degrees Fahrenheit), which led to warping when using ABS plastic in the original printer.
After printing four models, however, I found I had issues with the print bed — the filament began peeling away mid-print. I re-leveled the print platform several times to ensure the proper distance from the nozzle (the print bed is easily removable by loosening just two thumb screws), but the filament continued to detach.

Taking a page from 3D printers I’ve reviewed in the past that didn’t have heated beds, such as the MakerBot Replicator, I covered the CraftBot’s bed with a thin coating from a glue stick. That worked on a couple of prints, but began to fail as time went on.
CraftUnique also suggested wiping off the surface of the bed with acetone to remove the “fat.” The PLA (polylactic acid) plastic filament with which I was printing is biodegradable polyester derived from renewable resources, which can include cornstarch, tapioca roots or sugarcane. Where the fat comes from I do not know.
I’d never heard of this remedy before, but I tried both acetone and a soapy water scrub of the print plate, and both seemed to work equally well.
I later found, however, printing multiple objects continued to reveal problems with print bed adhesion.
I settled on covering the print platform with masking tape, and that solved the issue. Everything stuck after that — but CraftUnique should really try a different platform surface.
Other issues
I found a couple of smaller issues as well. For one, the CraftBot has no native data storage or wireless communication. The lack of wireless communications and onboard storage means you must either keep your computer tethered to the printer via a USB cable throughout a print job or else print models from a thumb drive via the printer’s USB port. But since I consider having a source of removable storage (the thumb drive) on the 3D printer to be the next best thing to onboard storage, it’s not a huge deal.
Another little issue I ran into was that, on several occasions after completing a print job, the print platform failed to return to its lowered home position. This made it difficult to remove objects, because the print platform remained snugged up against the extruder head.
It was easily fixed — I simply had to use the handy LCD menu on the printer to manually lower the print bed. It was either that or remove the metal plate from the platform using two thumb screws — also an easy fix. It would be nice if returning the print bed to a lowered “home” placement were automated, though.
Bottom line
Overall, this 3D printer was well thought out. Little things demonstrated that a lot of thought went into this machine, such as placing the USB cable connector port on the side instead of the rear so there’s less distance for the cable to travel between a computer and the printer.
I’d place this 3D printer near the top of my “recommend” list because of its reasonable price, speed and accuracy. However, its drawbacks such as buggy software and the problem of objects detaching from the heated print bed keep it from getting the highest marks.
CraftUnique’s crowdfunding pitch was simple: Create one of the highest quality desktop 3D printers at an affordable price. I think in many ways the company has achieved that goal. This is a good, but not a great, 3D printer for its price.
Now… just a few more tweaks and it would indeed be among the very best.
[Source:- Computer world]