

We’ve just about finished our brief tour of Profile Manager, 15 episodes and loads of information, but, I’m happy to say, this won’t be our last look at Apple’s Server app. We’ll look at other Server features in the weeks ahead.
For the entirety of this class we’ve looked at adding devices to Profile Manager using Profile Manager’s User Portal, which links devices to specific users. The reality of enterprise environments is that you’ll want to enroll devices as soon as the box is opened or using some kind of imaging system, such as Server’s Netinstall service. We’ll look in detail at each of these services other Working Mac columns in the weeks ahead, but for now, let’s look at how you can quickly and easily enroll and manage devices in Profile Manager by creating Groups and using manually installed Trust and Enrollment Profiles.
Create a device group
If you’ve worked in IT for any length of time you know the best way to manage users and devices is to create groups, put users and devices into those groups, and then manage each group’s access to resources. You can use Profile Manager to manage groups of users and devices.
- Log in to Profile Manager.
- Click Device Groups.
- Click the + at the bottom of the Device Groups column. This will create a new group with the default name, New Device Group.
- Change the group name to All Devices. Note that the group contains no members. Since we’re creating a setting for All Devices, we’re going to add a setting that’s obvious and easy to check. For the sake of the exercise we’ll assume you’re using a Mac. Choose something equally as obvious if you’re using an iOS device.
- Click the group’s Settings tab.
- Click the Edit button.
- Located and select the Directory payload and click Configure.
- Enter the server information you used to bind to your Profile Manager server in episode 12.
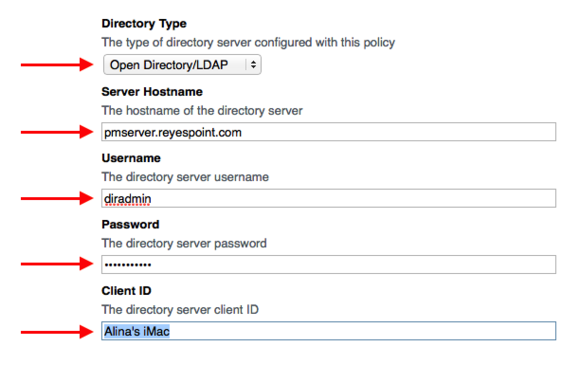
- Click OK.
- Click Save.
Create a device placeholder
Now that we have a group, it’s time to add a device to that group. It’s best, for this exercise, to use a device that hasn’t already been added to Profile Manager. You’ll need the serial number for that device to complete this exercise. In a real world scenario you can use Profile Manager’s import tool to import a spreadsheet of placeholder devices. For now we’ll create a single placeholder device.
- Select Devices in the Profile Manager sidebar.
- Click the + button at the bottom of the device list.

- Select iOS/OS X from the Device Type menu.
- Give the device a name.
- Enter the serial number for the device.
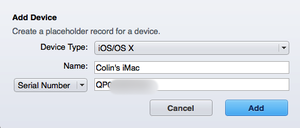
- Click the Add button. Note that you now have a device placeholder.

Create an enrollment profile
Enrollment Profiles are used to automatically enroll devices in Profile Manager. When you install an Enrollment Profile on a Mac the profile links it to your Profile Manager server. Additionally, devices using an Enrollment Profile can be automatically added to Device Groups.
- Click the + button in Profile Manager’s Library list.
- Click the resulting Enrollment Profile menu. This creates a new Enrollment Profile.
- Give the Enrollment Profile a name.
- Select the Enrollment Profile’s Settings tab.
- Leave the check in the box that says, Restrict use to devices with placeholders. This makes it so that only devices with placeholders will be enrolled in Profile Manager when this profile is installed.
- Click the + button below the Device Groups list.
- Click the Add button next to the group you just created.
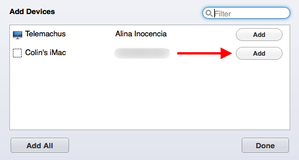
Adding this Device Group automatically adds any devices using this Enrollment Profile in Profile Manager as long as you have a placeholder for this device in your device list.
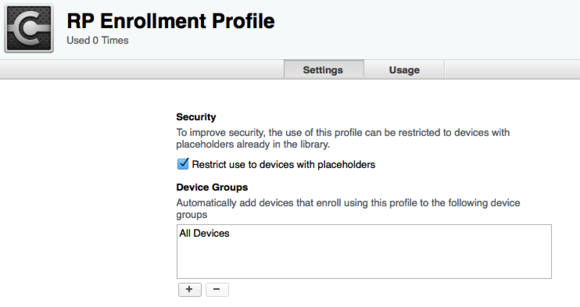
- Click Done.
- Click Save.
- Click the Download button for the Enrollment Profile.
- When your Mac asks you to install the Profile, click the Cancel button. The Enrollment Profile should now be in your Downloads folder.
A matter of trust
You may recall that when you were using the My Devices portal, before you could enroll your personal device, you first had to install a Trust Profile. The same is true when you’re manually enrolling devices in Profile Manager. You now need to download your Profile Manager’s Trust Profile.
- Click the Admin Menu at the upper-right-hand side of the Profile Manager window.
- Click the Download Trust Profile menu in the Admin menu.
- When your Mac asks you to install the Trust Profile, click the Cancel button.
Install the profiles on an unmanaged device
The final step in the process is to install these profiles on a device that isn’t currently managed using Profile Manger.
Remember: If your Profile Manager server doesn’t have a DNS record on your default DNS server, you will have to change the DNS settings on the placeholder device to point to your Profile Manager server.
- Copy the the Trust and Enrollment Profiles from your Downloads folder to a thumb drive or use some other method to copy the file to the computer you added a placeholder for in the Placeholder exercise.
- On the Placeholder computer, double click the Trust Profile.
- When prompted, click Continue then click Install.
- If prompted, authenticate as an administrative user on that computer.
- Next, double click the Enrollment Profile.
- Click Install.
- Authenticate as an administrative user if you’re prompted to do so.
As soon as the Enrollment Profile is installed Profile Manager will automatically add the computer to the All Devices device group and apply the settings for that group.
- Look at the All Devices group in Profile Manager and verify that your placeholder device has been added to that group.

- On the enrolled device, open System Preferences.
- Click the Users & Groups preference.
- Click Login Options at the bottom of the window.
- Verify that your enrolled computer is now bound to your directory server.
The end…
And so ends our multi-week journey through Profile Manager. After a brief hiatus, in which we’ll go back to normal Working Mac content, we’ll pick up again with other features available to you in Apple’s Server app.
Cheers! We’ll see you next week with another Working Mac.
[Source:- Macworld]
jacktoto
toto slot
link slot
jacktoto
situs togel
situs toto
jacktoto
togel online
situs togel
jacktoto
bo togel
jacktoto
bandar togel
jacktoto
jacktoto
jacktoto
bo toto
jacktoto
bocoran hk
situs slot gacor
toto macau
togel online
togel resmi
situs bandar togel
bandar togel
situs slot
bandar togel
bandar togel
bandar togel
bandar togel
toto macau 5d
situs slot gacor
situs slot
jacktoto
jacktoto
jacktoto
situs toto
bandar togel
situs toto
toto togel
situs togel
situs toto
bandar togel
toto slot
situs togel
situs toto
jacktoto
jacktoto
https://www.slot.pn-kuningan.go.id/
jacktoto
situs toto
situs toto
situs togel
situs togel
toto togel
situs togel
jacktoto
situs togel
jacktoto
toto togel
toto slot
jacktoto
situs toto
situs toto

