
A few weeks ago, I decided to build my own computer — specifically one that can handle running high-resolution video games.
I could’ve just bought a ready-made PC from Asus or Alienware, two of the most well-known gaming PC brands. But I like the idea of choosing the parts that go into my computer so I know exactly how much they cost and I can pick them based on my personal preferences.
Plus, building your own computer is actually easier than most people might think, and it’s incredibly fulfilling and satisfying, too! All you need is the parts and a screwdriver.
I should note that this PC cost me a lot of money, but you can build a fantastic gaming PC for between $500 and $600.
Here’s how I built my very own high-end gaming PC, and how you can do it too.
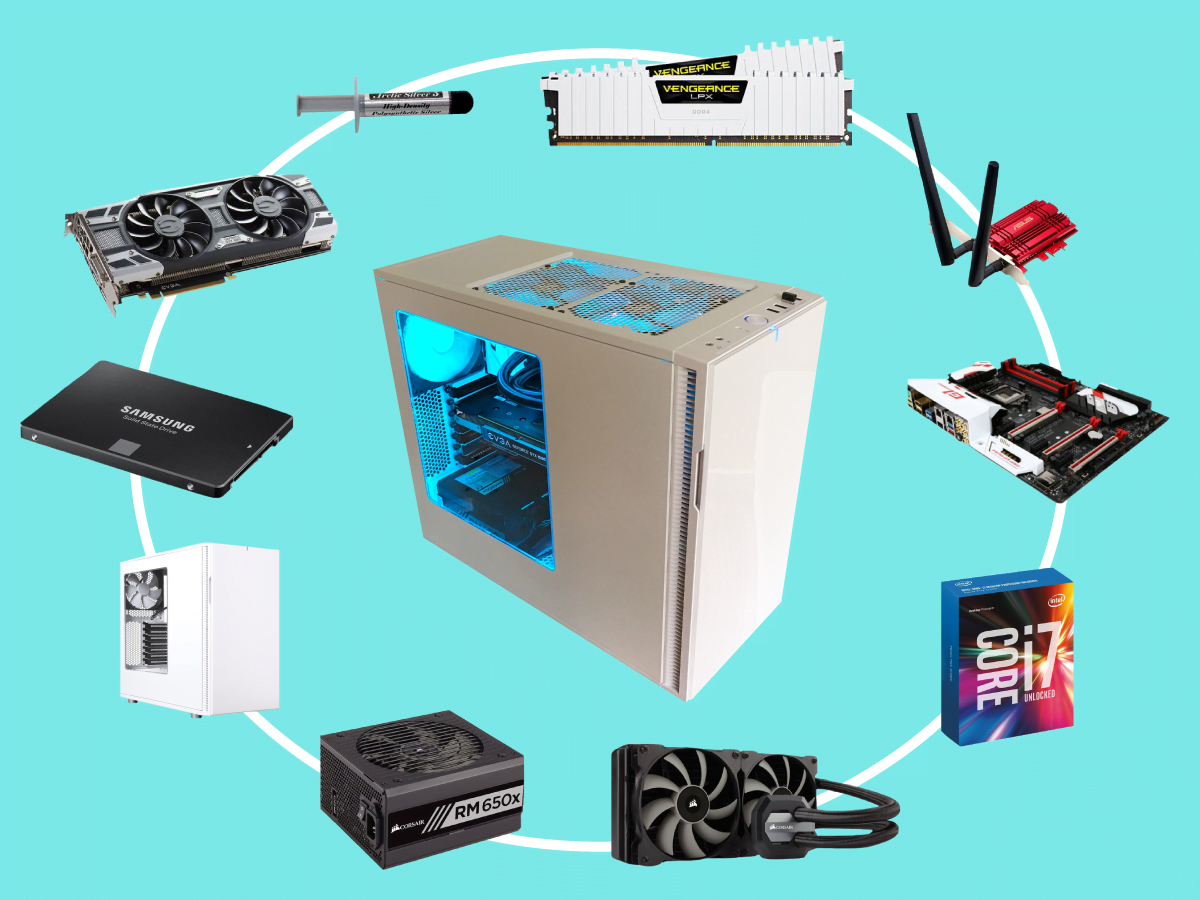
See that big white case on the left? I’m going to put all these labeled parts into that case to make a super-powerful computer that will play video games in 4K.

Antonio Villas-Boas/Tech Insider
In case you want to build a PC exactly like mine, I’ll list each component as they come up. There’s also a full list of everything I used at the very bottom of this story.
This is the motherboard, which acts as the host to most of the parts.

Antonio Villas-Boas/Tech Insider
This is the Gigabyte G1 Gaming GA-Z170X 7 motherboard — you can buy it here. It’s specifically designed for gaming, as it has some extra features that gamers will appreciate, like better internet performance. Gaming motherboards are also often built at a higher quality than regular motherboards, which means they’re often more expensive, too.
To be honest, gaming motherboards are overkill for most gamers, including myself. However, I chose a gaming motherboard because I went for quality over value with this build.
I started by installing the CPU (the square thing I’m holding) into the motherboard. It’s probably the easiest part of the whole build.

Antonio Villas-Boas/Tech Insider
The CPU is the brain of a computer, as it’s coordinating pretty much everything that’s going on in the computer.
I bought the Intel Core i7 6700K processor — you can buy it here. It’s one of the most powerful CPUs you can get at the moment and it’s total overkill for today’s gaming needs, as you can run games pretty smoothly with older and less powerful CPUs.
However, I’m planning to make this computer last a long, long time, so I wanted to future-proof it as much as I could with a powerful CPU that’ll exceed specifications for several years.
The CPU is installed and ready to go after I close the clasp that holds it down!

Antonio Villas-Boas/Tech Insider
The clasp is extremely tight on the CPU. I thought I was doing it wrong and it was going to break the chip, but everything was lined up and there was no reason for anything to go wrong.
Now it’s time to install the RAM into its designated slots.

Antonio Villas-Boas/Tech Insider
I got two sticks of the latest DDR4 RAM, with 16GB of RAM each for a total of 32GB of RAM, which is totally unnecessary and excessive. The brand is Corsair and the model name is Vengeance LPX. You can buy it here.
The RAM is a computer’s short term memory where it stores all the apps and files you’ve opened since turning on the computer, which lets you re-open those apps and files quickly. It’s as easy as plugging in a USB mouse into your computer.
Now it’s time to whip out the case and peel back that plastic film over the window panel. So satisfying.

Antonio Villas-Boas/Tech Insider
This case is called the Fractal Design Define R5 — you can buy it here. I opted for a windowed side-panel because I had never used one before, and I wanted to show off the powerful-yet-pricey parts, mostly to myself.
I also went with a white color theme to be a little different, as so many PCs are drab and black.
Here’s the case after removing the side panel. This is where all the parts go.

Antonio Villas-Boas/Tech Insider
The cables and wires that connect parts to other parts all go on the other side of the case, which has a dedicated cabling section.

Antonio Villas-Boas/Tech Insider
Before the build, it’s important to feed your body and soul for the adventure ahead.

Antonio Villas-Boas/Tech Insider
This is a roast beef and cheddar sandwich with olive oil mayo and potato bread. Untoasted. I can’t guarantee any PC build will work if you deviate from these sandwich specifications.
Once the feeding process was complete, I took out the “drive cages” that usually house hard drives and CD drives on the right of the case.

Antonio Villas-Boas/Tech Insider
One of the reasons I picked the Fractal Define R5 case is because it lets you remove all the drive cages.
Since I’ll only be using one SSD for storage, I don’t need any of these drive cages, which take up space and block airflow from the fans once the computer is up and running.
It’s time to install the motherboard’s “I/O shield.” It’s important to do this before installing the motherboard because you can’t add the shield afterwards.

Antonio Villas-Boas/Tech Insider
The I/O shield goes in pretty easily, but it can be finicky.

Antonio Villas-Boas/Tech Insider
And now I can install the motherboard using screws and the included standoffs to attach it to the case.

Antonio Villas-Boas/Tech Insider
All motherboards will come with instructions on how to install them into cases, and it’s simple.
You just need to make sure that you’re getting the right size motherboard for your case. This motherboard is an ATX size, which fits in mid-size tower cases. You can fit other sizes in mid-size tower cases, like micro ATX and mini ATX, which are pretty much the only motherboard sizes you really need.
Next up, installing the CPU cooler, which will, er, cool the CPU.

Antonio Villas-Boas/Tech Insider
If there’s one thing that CPUs hate, it’s heat, so it’s a good idea to get a good CPU cooler. I ended up choosing the Enermax ETS-T40F-W —you can buy it here.
This particular cooler is a radiator that sits on top of the CPU and sucks up all the heat into those metal fins in the radiator. Fans on either side of the radiator blow cool air through the fins so it can keep absorbing the heat from the CPU.
It comes pre-assembled the way it’s shown above, but you can add another fan on the right side if you want.
Before installing the cooler, I needed to add a smidgen of what’s called thermal compound, which helps transfer the CPU’s heat to the cooler’s radiator. I just dabbed a little bit of it right on top of the CPU.

Antonio Villas-Boas/Tech Insider
This thermal compound is popular among PC builders, and it’s called Arctic Silver 5. You can buy it here.
The CPU cooler is in and ready to keep things nice, chilly, and operational.

Antonio Villas-Boas/Tech Insider
At this point, I wanted to see if the the parts I had installed were working. But before I could do that, I had to install the power supply unit and plug the power cables into the motherboard and all the parts connected to it.

Antonio Villas-Boas/Tech Insider
This power supply unit is the Corsair RM650X. You can buy it here.
If the power supply unit was compared to a body part, it would be the heart, as it’s pumping power through to all the parts in the computer.
The computer’s now ready for its first test boot.

Antonio Villas-Boas/Tech Insider
And it didn’t work!

Antonio Villas-Boas/Tech Insider
The motherboard’s own basic display flashed the error code “55.” After looking it up in the motherboard’s manual, I learned that “55” meant there was an error with the RAM.

Antonio Villas-Boas/Tech Insider
I checked the RAM and noticed one of the sticks wasn’t quite pushed all the way into its slot, and it was sitting higher than the other.

Antonio Villas-Boas/Tech Insider
I tried booting up again after making sure the RAM was well seated into its slot, and it worked! The build continues.

Antonio Villas-Boas/Tech Insider
The screen is showing what’s called the BIOS. It’s the motherboard’s own operating system designed for tweaking and maintenance for your computer parts.
The reason why it’s not running Windows at that time is because I hadn’t yet installed the SSD where I had Windows 10 installed.
Now it’s time to install the graphics card. This is the most important part of a powerful gaming PC, and it’s the most expensive.

Antonio Villas-Boas/Tech Insider
The graphics card is the muscle of your machine, as it provides the processing power for super-smooth gameplay and super-high resolutions. For this build, I went with the EVGA GeForce GTX 1080 SC, which you can buy here.
I fit the graphics card into its designated slot, right underneath the CPU cooler.

Antonio Villas-Boas/Tech Insider
None of this would be useful if I didn’t have internet, and since I don’t have Ethernet in my house, I had to get a WiFi adapter card.

Antonio Villas-Boas/Tech Insider
Surprisingly, few motherboards come with built-in WiFi. At the same time, built-in WiFi probably wouldn’t be very good anyway, so you’re always better off getting a dedicated WiFi card.
This WiFi card it the Asus PCE-AC56 802.11ac Dual-band Wireless AC1300 PCI-E Adapter. Such a memorable model name. You can buy it here.
The WiFi card fits underneath the graphics card.

Antonio Villas-Boas/Tech Insider
Then it was time to install the SSD for storage. Thankfully, this case has SSD mounts in the cabling section. This is before I added the power and data cable to the SSD.

Antonio Villas-Boas/Tech Insider
For the SSD, I went with the Samsung 850 EVO 500GB. You can buy it here.
I just needed to connect the odd cable here and there for things like the case’s power buttons, power LEDs, and audio jack at the front, and I was basically done. Time to see if it all works!